Wednesday, June 3, 2015

Creating Fabric Paper Tutorial

"What is Fabric Paper?"  This is the question I get asked the most.  The short answer is: Fabric Paper is a fusion of fabric, paper, silk fibers, paints and other fun stuff to create your own one of a kind 'fabric'.  No, we aren't fusing in the traditional sense, but rather using a medium to adhere all the layers together.  Traditionally, and the way I first learned to make this rather addictive product, is to use either a PVA glue (book binders glue) or one of the various acrylic mediums such as Matte Gel Medium, as the adhesive.  The major problem with either product is that once dry, they become fairly stiff.  While still somewhat flexible, they were not quite supple enough for making purses or journal covers, at least in my not so humble opinion.  In my quest to find a product that produced that softness I was after, I realized that I already had the perfect product!  Jacquard Textile Paints: #101 Colorless Extender.


I've used Jacquard Textile Paints for many years now, always amazed at how soft they are on fabrics.  The Colorless Extender has all the properties of the paint, but no color so dries clear.  I've used this Colorless Extender mixed with glitters to make my own glitter paints, as well as to extend my Textile Paints without the use of water.  Since the product dries clear and extremely soft, it was the perfect solution!

The second most asked question is "Is Fabric Paper washable?"  The short answer to this is "No.".  Because of the paper content, it probably is not a good idea to toss it in the washer.  However, I have taken a soft sponge to wipe off a spot or two (I am a coffeeholic and have been known to spill every so often...ahem!) quite successfully so you can spot clean this way.  I would not use Fabric Paper for a bed quilt.  But for wall art, journal covers, purses, and the like it will work beautifully.


And now, what you have all been waiting for... the link for the tutorial.  Click here: http://laughingcatdesignsetc.com/howto
and download your very own pdf file.
Enjoy and Create!

(*please respect my copyright's here, I am sharing this freely but it did take me a lot of time, effort and money to create all of this.  Do not make copies and distribute. Please DO share the link to this blog and tutorial)

Saturday, June 23, 2012

Work In Progress (for too long)

I recently gave a lecture for the Westside Quilters Guild in Hilsboro, OR and completely re-vamped my power point presentation and notes for it.  One quilt I included in the slide show was of a Work in Progress I started nearly two years ago.  I included it to demonstrate several surface design techniques 'in use' on one piece. 

This is the photo included in the slide show.  I cropped the edges of the photo to give it a more finished look in the presentation but at the moment it is still all uneven raw edges while it is being quilted.  Techniques include purpose painted fabric that was backed with fusible web, the 'rocks' were cut out and fused down along with curvy cut strips of batiks, hand dyes, and over painted hand dyes (scraps of hand dye or batik that I added Lumiere paint to 'renew' them.) The rocks are stitched down with a straight stitch and then I used garnet quilting in between, some of the 'bubbles' are painted in with the same colors used on the rock fabric.  In the upper right corner of the main section of rocks, you can just make out some yarn that was needle felted in between the rocks.  At this point there is no backing yet on this quilt. 
 
This next photo shows the current state of the quilt.  I have finished the yarn needle felting, added backing and begun quilting the different fabrics.  All the dark pieces are quilted, which took more time because I was quilting in between all the rocks and yarns, lots of starts and stops.  I had started on the colorful pieces and was quilting just fine one day, then the next day my machine decided suddenly it did not want to quilt anymore and started shredding threads.  I have changed bobbins, re-threaded numerous times, changed needles several times and all those tricks we learn.  Now it goes in to the machine doctor to be tuned up.  I'll add more photos and updates as I continue working on this piece.  I want to finish the quilting on the various fabric pieces so that I can start beading.  I am also considering trimming this down a bit, taking off part of the top section to make it a bit more balanced.  What do you think?

Sunday, October 9, 2011

Homecoming Dress

You may be wondering what I have been up to lately; it has been SO long since my last post.  The answer is A LOT (and we'll get to that in a later post, I promise!), but one of the major things very recently was making a dress for my youngest daughter Megan to wear to Homecoming.  Now I may quilt, thread paint, and play with fiber art very comfortably... but I am not a garment sewer!  I of course sewed simple things for my girls when they were little, along with the usual home crafty stuff, muslin bunnies, etc. However, anytime I tried to sew for myself, I was totally lost and nothing fit.  This is something I have decided to learn 'for real' by signing up for an online course and buying the book.  Don't ask me why I agreed to take this challenge of formal dressmaking on, especially for a special event that my daughter would be counting on me to produce something for her to wear with pride.  Not to mention the fact that she designed her dress herself, on a sketch pad, and wanted me to produce what she had envisioned! 

With a promise from her to keep an open mind and compromise just a bit in design and fabric choices and with a budget of $60.00, we headed off to the fabric store feeling much like the designers on Project Runway.  Amazingly we found a pattern that was fairly similar to her design, and even better it was 'Easy' and on sale for 1.99!  Originally envisioning a white with blue dot underskirt, she agreed that rather than searching high and low for the perfect fabric, the sheer white with sparkles fabric would work.  We found the perfect navy blue satin, white tulle and lining, and a bright pink for a bow.  Plus, we had about 23.00 left in change!


By combining the two skirt styles on the dress, making a muslin and drawing on the over skirt where the split needed to be, I was able to get pretty darn close to what she had designed.  Then, because Megan is very tiny, we had to fit the bodice quite a bit.  This, I think, was the hardest part for me because I am still learning how all of these go together.  When you adjust the size on all these odd shaped little pieces, they do NOT line up anymore!  Eventually it all came together and Megan was thrilled with her new dress! 


We added heat set crystals to the top of the bodice, which did not really photograph well here but added just a touch of bling.  About an hour before she had to be at the restaurant to meet up with her friends, I discovered she did not have shoes after all (I had thought she was going to wear some flats she already had) and we had to run out to find a pair.  We ended up finding a cute little pair of slingbacks in white (one of those dye-able shoes they make for special occasions) that were on clearance for $15.00!  It was also BOGO (buy one get one half off) so we found a little silver purse for 10.99 and got it for 5.49!  I love a good sale!
I wish I had a good picture of Megan in her dress to show you all, but by the time we were taking them it was so dark that nothing really turned out well.  This was the best one I got.  She was hunched over because it was cold out as she paused so I could snap the pic before running inside, so it looks like it doesn't fit well.
Her friends were all amazed that her mom made this dress that she designed.  I am amazed I made this dress that she designed!!  I am also amazed that my youngest is somehow old enough to be in high school and attending Homecoming!

Monday, April 4, 2011

deColourant and deColourant Plus!

Fun New Product!  deColourant and deColourant Plus!


I was able to see a demonstration of this great new product and was totally blown away.  Discharging is something I have played with a few times, but because of the strong fumes and mess of bleach or the unreliable results of other discharge products I haven't really done a lot with it.  However, this new product has really impressed me for several reasons, not the least of which is the fact that it has little to no fumes.

First of all there are two types of product: deColourant and deColourant Plus.  The deColourant is just that, only the deColourant product that takes color out of any natural fiber (cotton, silk, etc. no synthetics).  It comes in two forms: a creme that is painted on and also a spray on.  The spray is fun for creating background effects, and also for soft speckled effect with stencils.


Then there is deColourant Plus.  This is the deColourant creme with a pigment and binder added in.  It essentially take the color out of the fabric and replaces it with a new color.  Amazing!  Note that this also comes in spray form, but my distributor is not carrying it at this point so I haven't gotten my grubby paint stained paws onto any... YET.


I was a bit skeptical at first, but after watching the demonstration and then playing with the product myself I am very excited at the possibilities. 

Play Day!

First Up: deColourant Creme!

I wanted to see what the results would be on the ultimate test fabric: Black. The first piece I did turned out pretty well considering I hadn't washed the fabric first.  I used a stencil from Cedar Canyon Designs to make the leaf shapes, then used my sponge brush to add patterning to the background.  The trick with this product is to LET IT DRY before you heat set it.  Now if you are like me and very impatient to get on with it, you can use a heat gun or even a plain ol hair dryer to dry the product.  Once it is totally dry, use a dry iron over the product.  I was amazed!  This photo shows the piece after it was heat set and after I hand washed it to see if anything came out.


When I realized I was using fabric that hadn't been washed, (big sigh, I know better) I took some pieces and washed them.  *Remember* when you wash fabric to paint on, never use anything with fragrance, softeners, or any other additives and don't use dryer sheets.  This will all interfere with any product you try to put on your fabric.  My results were much better with the washed fabric.  Remember, both pieces are the same fabric and only the deColourant creme with no pigment.  Notice how in the photo above the result still has some color in it, while the sample below with the washed fabric gave me much better results.  I have also hand washed this piece after heat setting to compare the results.


Next Up: deColourant Plus!

One of the things I was told during the demonstration was that hand dyed fabrics worked very well for this process.  Since I have a TON of my own hand dyed fabric laying around I decided to give it a go.  This is another stencil I carry from Delta, can you tell I love leaves?  I settled on a nice green fabric and used Red, Yellow, and Orange with a simple foam brush.  In the photo below you can see two leaves are finished and the one on the lower right is not yet heat set.  After drying the leaf it is dull and looks like I just used a regular fabric paint on the fabric.


Here I ironed most of the leaf so you could begin to see the difference.  See how the color is coming up on the upper right and middle of the leaf, replacing the green in the fabric!  The left and lower ends of the leaf are not yet heat set and so not quite as vibrant.


After the deColourant and deColourant Plus is heat set, it can be washed and dried like a normal fabric.  Make sure you really heat set it a good five minutes on all painted sections (move your iron around and you wont scorch the fabric) so that nothing washes out.  Once washed, there is barely any feel to the painted sections depending upon how much paint you used.


I can't wait to play more with this fun new product, deColourant and deColourant Plus!

Thursday, February 24, 2011

How To Series 1: Thread Painting 101 - Review and Wrap Up

What an exciting adventure this has been!  I have had so much fun sharing with all of you, and reading the feedback from emails and comments sent.  This has hopefully given you the tools needed to begin your own Thread Painting journey.  My hope is that by taking things one baby step at a time, Thread Painting would be less of a scary mystery that only 'advanced sewers' can do, and more of a fun learning experience that anyone can participate in and grow from. 

This has been a learning experience for me as well!  In the past I have had a blog and posted to it maybe twice a year... maybe.  Blogs have come a long way since then and when I started this one I had to essentially re-learn it all.  I am glad I did though, this has really been a rewarding experience for me!

Combining Stitches

Before we end this series, I wanted to show you some examples of combining the stitches we have learned.  While many of the pieces I have done use only one type of stitch, Thread Painting is extremely effective when the different stitch techniques are combined.


In the Hummingbird and Fuchsias quilt, the leaves and parts of the flowers use a directional zigzag stitch, while other parts of the flower and the buds use a directional straight stitch in order to emphasize the shape.

The Sunflowers detail shown below uses a combination of the directional straight stitch, directional zigzag, and zigzag meander on the petals, as well as zigzag meander and straight stitch detailing on the leaves.


In this detail shot of a vest I made years ago, the pansy flowers use both the meander zigzag and the directional zigzag stitching.  Notice the leaves use the directional zigzag to applique them, giving them a more feathery look.


And finally, this Lily was done using fabric paint and then Thread Painted.  A directional straight stitch and a directional zigzag were used.  The stamen details were also added using a very dense directional zigzag stitch.


Calling for Your Input

Have you been practicing your Thread Painting?  I'd love to see what you've been working on and I am sure everyone else would too!  If you have played with the Thread Painting techniques on a project or practice piece, I'd like to post some photos right here on the blog.  So finish up those projects, or even a Work In Progress  and send a .jpg file along with what you used and where and we will get it up on the blog.  Do you have questions or need advice or clarification on something?  Send those too and I will try to answer as best as possible.  Pictures are worth a thousand words, so try to send a picture ( in a .jpg format please) along with your questions, comments, or success stories. How to get in touch with me?  Click here to Email me.

Whats next??

That is my question...  I plan on sharing what I am doing in the studio, whether it is a pattern or project in progress (I have several of those going!) or just Fun Stuff that I come across or am playing with or learn about.  But what I'd like to know is what do you want to see?  Let me know!


A Great Big Thank You!

I want to tell you all Thank You for all the support, the encouraging words, for sharing the link here and for just plain reading and learning from this series.  I can't tell you how much fun I have had interacting with all of you!

Angela R McIntyre
Laughing Cat Designs

Thursday, February 17, 2011

How To Series 1: Thread Painting 101 - Directional Straight Stitch

We have learned about the proper tools and correct supplies, how to Thread Paint using a basic meander zigzag, add detail with a basic straight stitch, and last week we learned how to expand on the zigzag stitch by using it directionally.  However, there are times when a piece needs to be thread painted, but the zigzag stitches just don't fit in with the feel of the piece and it needs a bit more than detail work.


Directional Straight Stitch

I call this a directional stitch because it uses a very purposeful direction in the stitch in order to get the look we are after.  With this stitch we can accomplish both painting with thread to apply the colors we want, and control the shape and add motion to the piece.  As with the detail lines, we use our 'S' curves rather than a straight line.  By adding many more lines of stitching we build up the thread painting adding color just as we did with the zigzag stitching.  Remember that these lines are not always an S but they always have at least a bit of a curve in them.  This will help to shape our pieces and give them a more natural appearance.  


Straight Stitch Thread Painting 

In some cases, we don't really want to build color up from shadows as we have in the past, but just to add color to liven up a piece.  In the sample below, the color additions liven up the foliage. Most of the time we backtrack along the stitch line and then branch off for more stitch lines. I can also carefully travel a few stitches along a seam line or the base of the applique piece to the next position, and then continue Thread Painting.  Another method, especially useful when many lines of stitching are on a piece, is to not quite follow all the way along your stitch line when backtracking and end up an eighth to a quarter of an inch away from your start point.  These techniques allow you to travel along an applique piece without it being too noticeable.


Adding Motion

By adding long lines of thread painted color, we also add motion to our pieces. In the case of the Flower Bowl below, we have room to add long curvy lines to give the effect of a flower petal that has curve and flow.  Notice some of the darker contrasting thread colors that emphasize these curving lines.


Building Color

Our colors are built using the same methods as before, we are just using the straight stitch.  Add your cool tones and shadows first, working your way up through mid tones, and then lights and highlights.


Homework: Play with this expanded version of the straight stitch and practice building color and thread up.  Remember to practice traveling and the S curve.

Next week - Final Installment

Examples of combining stitches, and a review of what we have learned in this series.

Friday, February 11, 2011

How To Series 1: Thread Painting 101 - Directional Zigzag

The key to successful Thread Painting is Practice, Practice, Practice!  Have you been practicing your Thread Painting?  Now that we have the basics covered, it is time to expand on the stitches we have covered.  In the first Thread Painting stitch, zigzag meander, we used a zigzag stitch to apply thread color to where we wanted it.  With this new stitch we will be a bit more deliberate about where we apply our color.  In the quilt below, Hummingbirds and Fuchsias, much of the Thread Painting done on the applique pieces was a directional zigzag stitch.

Hummingbirds and Fuchsias

Directional Zigzag

The reason I call this a 'directional' stitch is because we are not just meandering but rather stitching in a specific direction to get a specific result.  The stitch is done by setting your machine to a medium width zigzag, feed dogs lowered of course, and stitching from side to side.  No moving all around, we always move side to side with only a very slight forward or backward motion in order to stitch the areas we need to cover. 


This stitching can be done very lightly for touches of color, on up to very heavily stitched pieces that look almost machine embroidered.  This is in fact the stitch we use for Free Motion Embroidery.  When we stitch heavier we need a bit of extra stabilizer, as this stitch tends to pucker a bit more than the meander or simple straight stitch detailing.  On the 'Hummingbirds and Fuchsias' quilt above, I used two layers of Stitch n Tear, and left the stabilizer under my applique pieces while I Thread Painted.  Once I was done I removed it from around the pieces, and ironed with steam using a pressing cloth.

Practice

Lets practice the stitch.  Layer a practice piece of fabric onto a stabilizer.  You can use two layers of stitch n tear or a piece of the Decor Bond.  Since we are just practicing, it is nice to have the extra stabilization to make it easier to stitch.  This can always be adjusted depending on the project you are working on.

Place your hands on either side of the fabric and begin stitching.  Slowly move side to side, a few inches at a time.  Try a a bit of a meander in your side to side stitching by moving slightly forward and backwards and back and forth as you create a line of side to side stitching.  Play with the stitch, moving slower while your machine stitches faster, and then switch to moving a bit faster with a slower stitch speed.  Pay attention to your results. Now cover a smaller area, concentrating on building color.  Alternate the length of your side to side stitch; this will be essential to blending and a more natural look. 


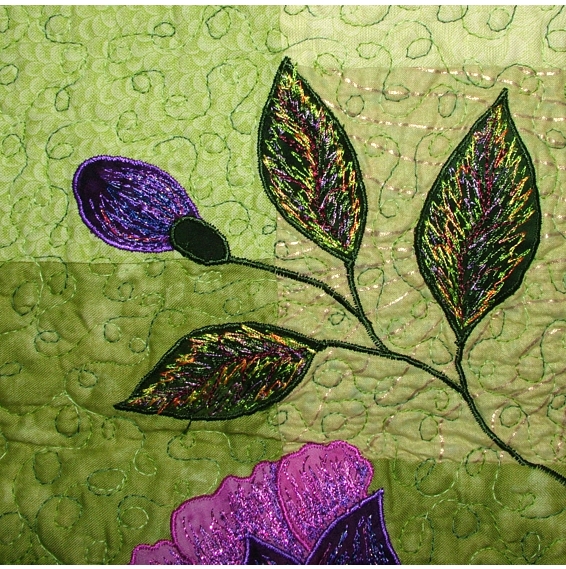
Rotating and Pivoting

Sometimes we need to rotate or pivot when we apply color with the directional zigzag.   This is done by always returning to our 'center point' before pivoting to a new direction.  In the Pansy below, the center point of the flower pieces is at the base of each petal.  Along the leaves the center is the vein line.


Building Color

Now that you have the feel of the stitch, lets Thread Paint a basic leaf shape using the Directional Zigzag stitch.  As with the basic Meander Zigzag, we stitch our colors in order starting with shadow and cool tones, then the mid range colors, and finally highlights and warmth.  Each of these can have as many colors as it takes to get the effect desired.  There are always exceptions to the 'rules' however.  In the Pansy above I was concentrating more on adding color to the flower than adding the basic shadow/mid range/highlight.  Those basics are in there, but in order to get the coloration I wanted I 'broke the rules' so to speak.


To keep this simple we will use just three colors.  One shadow, one mid range, and one highlight.  Remember that these three basic colors can also be variegated.  This will give the look of having added much more thread color than we actually did!  I chose a very muted green fabric so that you could see the thread work a bit easier as well.

Start Stitching

Machine applique a basic leaf shape to a background fabric, using two layers of stitch n tear or a piece of decor bond as your stabilizer.  Try to make a slightly larger leaf, so that you have room to actually practice.  On the leaf, trace a line for the center vein using a chalk marking pencil.  Now mark directional lines as shown.  These lines will give you a guide as you begin stitching so that you will know both where to stitch and what direction.


Shadows/Cool

Begin stitching along one side of the vein with your cool color.  On my leaf I am using my favorite muted dusty purple to add cool.  Stitch side to side, always stopping along the center vein line but varying the length of the stitch line on the other side.  Pivot as needed along the vein line to keep your stitching fairly parallel to your guide lines.


Mid-range

Now switch to a medium tone, I used a nice green that went well with my leaf color.  Stitch around the cool tone on the one side, carefully pivoting at the tip of the leaf, and then stitch along the vein line down the other side.  Remember to blend into the shadow/cool area.


Highlight

For my highlight color I am using a warm variegated yellows/oranges thread. This will do two things, it adds warmth and highlight at the same time, and it will help you to see the difference in the stitching for our example photo.  Stitch along the edges of the leaf as shown, and then add just a bit to the middle of the mid range area.  This creates kind of a visual 'bend' in the leaf by bringing that portion a bit more forward.


I use this same basic method for the flowers and birds in the Hummingbirds and Fuchsias quilt, and for the pansy applique.  In the photo below, the Leaf Bowls used the directional zigzag stitch over the entire leaf and many more colors are used.  You can see how building up your colors really makes a difference in the overall look of the finished piece. *Note - the Leaf Bowls (and the Flower Bowls) use a much heavier stabilizer called Fast2Fuse Heavyweight in order to give them the heft they need to become 'bowls'.


Homework:  Practice, Practice, Practice!  Play with different shapes, leaves and flowers and such, and use the Directional Zigzag stitch.  Build multiple colors up to achieve a painterly effect.  And absolutely have FUN with it!

Next Week:  Straight Stitch II - Thread Painting with a straight stitch.

Revisit this basic technique and play with more directional stitching in Straight Stitch Thread Painting.  Achieve a completely different look to your thread painted pieces.  Oh the things you can do with a straight stitch!