This has been a learning experience for me as well! In the past I have had a blog and posted to it maybe twice a year... maybe. Blogs have come a long way since then and when I started this one I had to essentially re-learn it all. I am glad I did though, this has really been a rewarding experience for me!
Combining Stitches
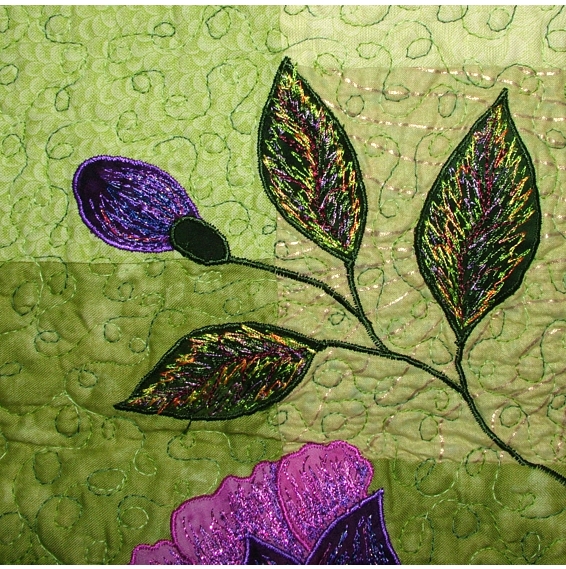
Before we end this series, I wanted to show you some examples of combining the stitches we have learned. While many of the pieces I have done use only one type of stitch, Thread Painting is extremely effective when the different stitch techniques are combined.

In the Hummingbird and Fuchsias quilt, the leaves and parts of the flowers use a directional zigzag stitch, while other parts of the flower and the buds use a directional straight stitch in order to emphasize the shape.

In this detail shot of a vest I made years ago, the pansy flowers use both the meander zigzag and the directional zigzag stitching. Notice the leaves use the directional zigzag to applique them, giving them a more feathery look.

And finally, this Lily was done using fabric paint and then Thread Painted. A directional straight stitch and a directional zigzag were used. The stamen details were also added using a very dense directional zigzag stitch.

Calling for Your Input
Have you been practicing your Thread Painting? I'd love to see what you've been working on and I am sure everyone else would too! If you have played with the Thread Painting techniques on a project or practice piece, I'd like to post some photos right here on the blog. So finish up those projects, or even a Work In Progress and send a .jpg file along with what you used and where and we will get it up on the blog. Do you have questions or need advice or clarification on something? Send those too and I will try to answer as best as possible. Pictures are worth a thousand words, so try to send a picture ( in a .jpg format please) along with your questions, comments, or success stories. How to get in touch with me? Click here to Email me.
Whats next??
That is my question... I plan on sharing what I am doing in the studio, whether it is a pattern or project in progress (I have several of those going!) or just Fun Stuff that I come across or am playing with or learn about. But what I'd like to know is what do you want to see? Let me know!
A Great Big Thank You!
I want to tell you all Thank You for all the support, the encouraging words, for sharing the link here and for just plain reading and learning from this series. I can't tell you how much fun I have had interacting with all of you!
Angela R McIntyre
Laughing Cat Designs
Your thread painting series are amazing! Very good description from a gold-handed quilter. Thanks for sharing! I learned a lot of thing from your class.
ReplyDeleteI am practicing and already able to see a difference in my work. Thank you sew much for the tutorials. With clear instructions, it is easy to continue.
ReplyDeleteI taught a thread-painting class yesterday for my guild. The students were quite intrigued and had lots of questions. I gave them a hand-out that included the url of your blog series and I know many of them will check it out and find it very helpful. You've done a great job putting the lessons together. Thanks!
ReplyDeleteI want to thank you for these tutorials. I have been playing around with thread painting for several year and want to do some more. I have saved you lessons in a word document for when I have some time to practice, (hopefully soon). I am sure anything you put on will be of interest to see.
ReplyDeleteThis IS the best threadpainting tutorial series I've seen. I keep coming back here as I have time to learn to use more threadpainting to accent my quilts and other things. I see so many possibilities for using this...clothing, postcards, quilts, etc.
ReplyDeleteThank you, thank you!!
Thank you so much. As a painter and a new quilter I can't wait to incorporate your teaching into a project I am working on. It just needed something more.
ReplyDeleteThis was great inspiration.
It is now a few years since you posted these blogs, and I am so glad that they are still here. Thank you so much, they are very well presented and very helpful. Some kind person linked one of them to Pinterest. We live in a great era!
ReplyDeleteAll I can say is wow. This is such a beautiful expression of creating some very exquisite pieces. Thank you for this wonderful tutorial now I shall try to do a bit of my own creating. Thank you again so much for sharing.
ReplyDeleteThank you for this tutorial! So much work went into this, it's beautiful!
ReplyDelete